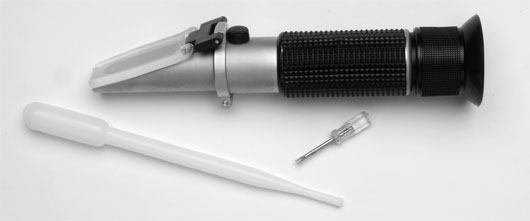
*Hand Refractometer method of operation
NAME OF COMPONENTS
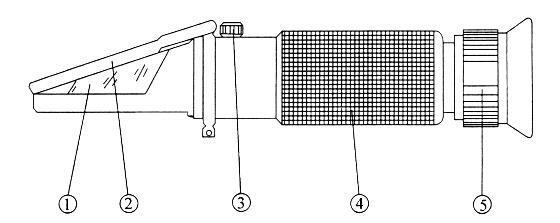
1.Prism 2.Cover plate 3.calibration screw 4.Rubber tube 5.Eyepiece
METHOD OF OPERATION
1.Prepare: Aim the front end of the refractometer in the direction of a bright light, and adjust the adjusting ring of diopter(5) until the reticle can be seen clearly.
2. Calibration:
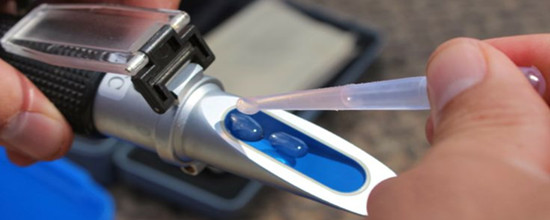
Calibration A: This calibration just use for measure from 0%. open the cover plate(2), drop one or two drops of distilled water on the prism surface, closed cover plate, press it lightly, then adjust the correct screw (3) to make the light/blue boundary concide with null line.
Calibration B: About the Honey refractometer (Model: H-120ATC and Model: H-123ATC) and Brix58~92% (Model: H-115ATC). Drop one drop of standard solution on the bright surface of the reference block. Open the cover plate(2),stick the reference block on the surface of the prism, and press it lightly with your hand, so that it can not slide down. Rotate and adjust the calibration screw(3) to make the light/blue boundary coincide with reference line is Brix 78.8%. And the Honey water refractometer (Model: H-112ATC) is calibration reference line to 19.6%.
Calibration C: About the Brix28~62% (Model: H-107ATC). Drop one or two drops of saturated sodium chloride solution on the prism surface, closed cover plate, press it lightly, then adjust the correct screw (3) to make the light/blue boundary concide with null line. Adjust to 29.9% at 15oC, adjust to 29.6% at 20oC, adjust to 29.2% at 25oC
3.Measurement:Open the cover plate(2),clean the surface of prism with a piece of soft cotton flannel, Drop 1~2 drops of the solution to be measured. Close the cover plate, and press it lightly, then read the corresponding scale of light and dark boundary. The reading is the numerical value of the measured solution.
4.After measurement, clean the surface of prism and cover plate with moist gauze, and it should be stored carefully.
ATTENTION AND MAINTENANCE
1.Adjustment for the null liquid and specimen should be in the same temperature. Once the temperature move greatly, the null point should be adjusted once per 30 minutes.
2.After usage, do not use water to wash the instrument, so as to avoid water entering the inside of the instrument.
3.This is a precision optical instrument. Handle it gently and take good care of it. Do not touch or scratch the optical surface. Please keep it in a dry, clean and non-corrosiveness environment, to prevent the surface from turning mouldy and foggy. Please avoid strong shock during transportation.
4.If the consumers use the instrument in accordance with the mentioned method of usage, the optical performance should not be changed.
TEMPERATURE COMPENSATION
The reference of temperature is 20°C. In operation, the temperature should be made according to the correcting table .
ATC is mounted with Automatic Temperature Compensation, it has the extra function, it enable user concentrate on measurements without worrying the temperature. Compensation range is 0~30oC.
ACCESSORY
1.Cleaning cloth
2. Pipette
3.Screwdriver
4. Manual of operation
1. Introduction
D Portable Digital Refractometers are microprocessor-based with laboratory accuracy to be able to accurately and instantly measure the refractive index(RI) , concentration and other parameters for many kinds of liquids, which also have a friendly operation pattern and display field as well as an automatically temperature compensation system, including 6 series and 12models , comparing with the traditional hand held ones they are much faster, more accurately, and clearly in measurements, as to the details for series and models please refer to the Appendix 2.
1.1 Panel descriptions
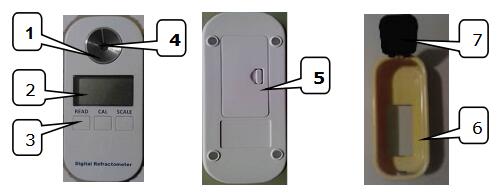
1. Stainless Steel Sample Plate 2. LCD Display Screen 3. Keypad 4. Prism
5. Battery Compartment 6. Removable Shell 7. Cover
1.2 Host and the spare parts
This instrument includes 1 set of host, 1 dropper, 1 removable shell, 1 Covers and 1 AAA 1.5v battery.
Before operating your instrument, please read this manual properly.
2. Display Areas and Buttons
2.1 Display
This LCD screen has three main display areas, which are host display area, temperature display area,
and muti-function display area and others,please see the P2.1 and the following description:
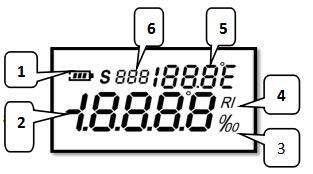
1. Battery volume unit
2. Host display area
3. % or ‰ unit
4. Refractive index (RI) unit
5. Temperature display area
6. Multi-function display area
2.2 The buttons
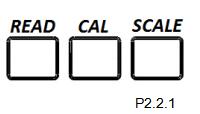
D series has three buttons, respectively is:
1. The “Read” button: for booting / measuring.
2. The “Cal” button: for entering the model of calibrating “Zero Point”
3. The “Scale” button: for converting different scales / converting
temperature systems between Celsius and Fahrenheit. All the details please referrer to the P2.2.1.
3. Preparations before operating
3.1 Install the battery
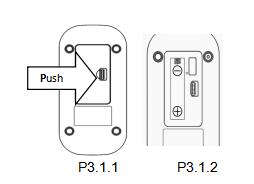
1. Open the battery cabin by pushing the cover’s lock key along the direction of arrow showing, please see the P3.1.1
2. Refer to the P3.1.2 to put 1 piece of 1.5v battery into the cabin in a proper electrode side and recover the cabin again
3.2 Install the wrist strap
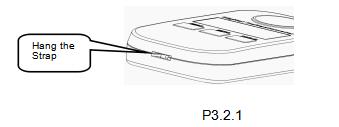
Properly Install the wrist strap into the hole at the bottom of the instrument, referring to the figure P3.2.1 .
4. Booting and Calibration
4.1 Booting
Press "Read" button for 1 second , the instrument would switching on and booting. Please see the P4.1.1.
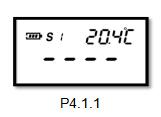
Note: 1.The multi-function display area would show the current scale number.P4.1.1 for example: S01 is expressed for the fist scale.
2. Before dripping into the sample liquid, please clean the sample plate and Prism with soft clean cloth or soft paper.
3. Please keep the instrument in a stable and still statement and position.
4. Please ensure instrument, environment and sample are in the same temperature level before measuring.
4.2 Calibration
1. Drip 4 ~ 5 drops of distilled water in sample plate.
2. Press “CAL” button for 2-3 seconds till see the ‘CAL’ flashing ,

3. Press "CAL" button once again during the ‘CAL’ flashing, see the display
the calibration is over, the value would be 0.0%, If no any operations for 10seconds the instrument would return back to booting status.

If fail to complete the calibration, multi-function display area would show an error code.

Note: 1. If multi-function area shows code A01 that means calibration temperature exceeding the limitations, other error codes could be checked in the appendix error code page.
2. Instrument support only distilled water calibration.
5. Measurement
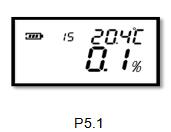
After the calibration, clear the distilled water and dry the sample plate, drip 4 ~ 5 drops of sample, press quickly 1 second the "Read" button, the instrument would give the
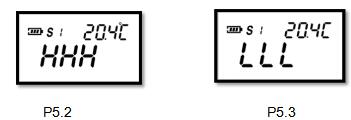
current value accordingly, after automatic temperature compensation, please see the P5.1, If exceeding the measuring scope, ‘HHH’ or ‘LLL’ would show in
the host display area, please see the P5.2 and P5.3.
If press the "Read" button for 2 seconds, the instrument would make the automatic measurements upon programmed times (default 15times), the final value is the average
of 15 times’ measurements,After measurements, the multi-function display area would return back to scale showing status.
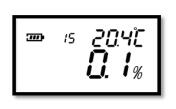
Note: multi-function area would show the remaining times left during the automatic measurement.
6. Scales converting and temperature systems converting
6.1 Scales converting
D series could support 10 scales in the largest: Pressing the 'Scale’Button each second can convert the scales and the values,

6.2 Temperature system converting
D series support two temperature units which Are Celsius (0.0 ~ 40.0 ℃) and Fahrenheit (32.0 ~ 104.0 ℉) Press “Scale” button for 2 seconds, temperature unit would be converted.
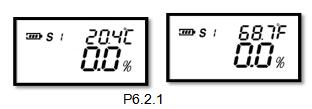
If exceed the temperature limitations, the signs “HHH” or “LLL” would shows, please see the P6.2.2 and P6.2.3

7. Turn off the instrument
If without any operations for 1 minute, the instrument would automatically shut off.
8. Maintenance and preservation
1. Please clean and wash the sample plate with distilled water and dry it with soft cleaning cloth or paper towel after finishing the measurement of one kind sample.
2. Never leave the remains and residuals of samples in the sample plate for long time.
3. After finishing measurements of the corrosive liquid, please clean the sample plate as quick as possible to avoid the irreparable damage of the prism and metal surface of the plate.
4. Please use soft cleaning cloth or paper towel to clean the sample plate to avoid scribing the prism’s glass,
5. Keep dropper and cleaning cloth to be clean and dry under the preservation.
6. If no using the instrument for a long time, please remove the battery and preserve it in a cool and dry place.
Appendix 1

The error codes table:


